Don't forget to like me at:
www.facebook.com/theclosethousewife
for daily observations and tips.

If you have suggestions for topics feel free to email me at:
closet.housewife@gmail.com
Thanks for stopping by!

Sunday, February 16, 2014

Conquering the Dreaded Fitted Sheet (How to Fold Sheets so That Look Like They Could be on Display)

Those of you who know me, you are aware of the hate-hate relationship that I've had over the years with the vile fitted sheet.  All kinds of stall tactics to never, ever have to fold them were implored.  From washing, drying and remaking the bed all in the same day (with the same set of sheets) to just wadding the thing up in a ball...I realized when the thought of reorganizing our linen closed made me break out in a cold sweat (because THAT sheet was in there), I had a problem.  I don't know what gave me the courage to finally face my issue head on (it could have been the 4 cups of coffee), but after ehrhumm5hourserhhhcough, cough...I finally put the sheet "to bed." [Pun intended.]  Here is a step by step on how:
  
Take your flat sheet and fold it in half, then
going the opposite way, half again so that
it is in quarters.  Lay it out on a flat surface
(either a table or bed will do).
Some fitted sheets do not have the elastic
that goes all the way around.  If so in your
case, find the four corners of the sheet
(where they've sewn in the side seams
to allow for the mattress's thickness).
take two of the seams and pinch them
together.  With your other hand take the
other two seams, pinch them together.
The sheet should sag like a "u" between your
two hands.
Take the two sets of pinched seams and
bring them together, folding the sheet
in half loosely.
You see here that I have the four pinched
seams in my left hand and I am straightening
out the un-elasticized edge with my right.
I stuck to fingers into the loops and pulled
them taught. 
Then I found the sewn in mattress thickness
seam allowance and flipped all four into one
another and using my left hand made the
sheet fold into itself while holding the looped
portion of the edge in my right hand.
Gently lay the sheet down on top of the
flat sheet so that it looked like this.  I
never realized that there could actually be
two flat folds (on the right and bottom of
the picture). 
Taking the left third of the flat sheet, fold
it onto itself with the fitted sheet inside.
Fold right third into the middle.
Next fold the pillow cases (all but one for
the set).
Fold down in half.
Fold up into quarter.
Fold from left to right.
Fold again from left to right.  Repeat for
each case (except for one).
Go back to sheets.  Fold in half from
top to bottom.
Fold in a third from top.
Fold remaining third up and then flip over
so that the seams are on the bottom.
Lay out the remaining pillow case so that
it is longer from left to right.  (I put the
open end on the right.  Place sheets on
top of pillowcase towards the left (un-open
end of the the case); then, lay the folded
pillowcases on top of the sheets. 
While holding the pillowcases tight to the
sheets, put your left hand under the bottom
pillowcase (like a spatula) and fold the items
over towards the right.
Fold over again from left to right.
Your sheets/cases should look a burrito.
Add the finishing touches by stuffing the
extra pillowcase into the sheets' crevices.
Wallah!  Isn't it beautiful??!!??
I hope that this tutorial helps you.  It is possible that in the near future (when I get the guts up to go on camera) that there'll be a video which may be even more helpful.

Myself, I've done this three times since figuring it out and it just keeps getting easier...no more dreaded fitted sheet.  We're friends.

Friday, February 14, 2014

28 Day Cleaning/Organizing Challenge (Day 13 - School-Agers Closet)

I figured, haven taken the giant leap of faith going head on with the school-ager's drawers that staying in his room and finishing up might be a good idea.  So, the next area in need of organization and cleaning...the closet!


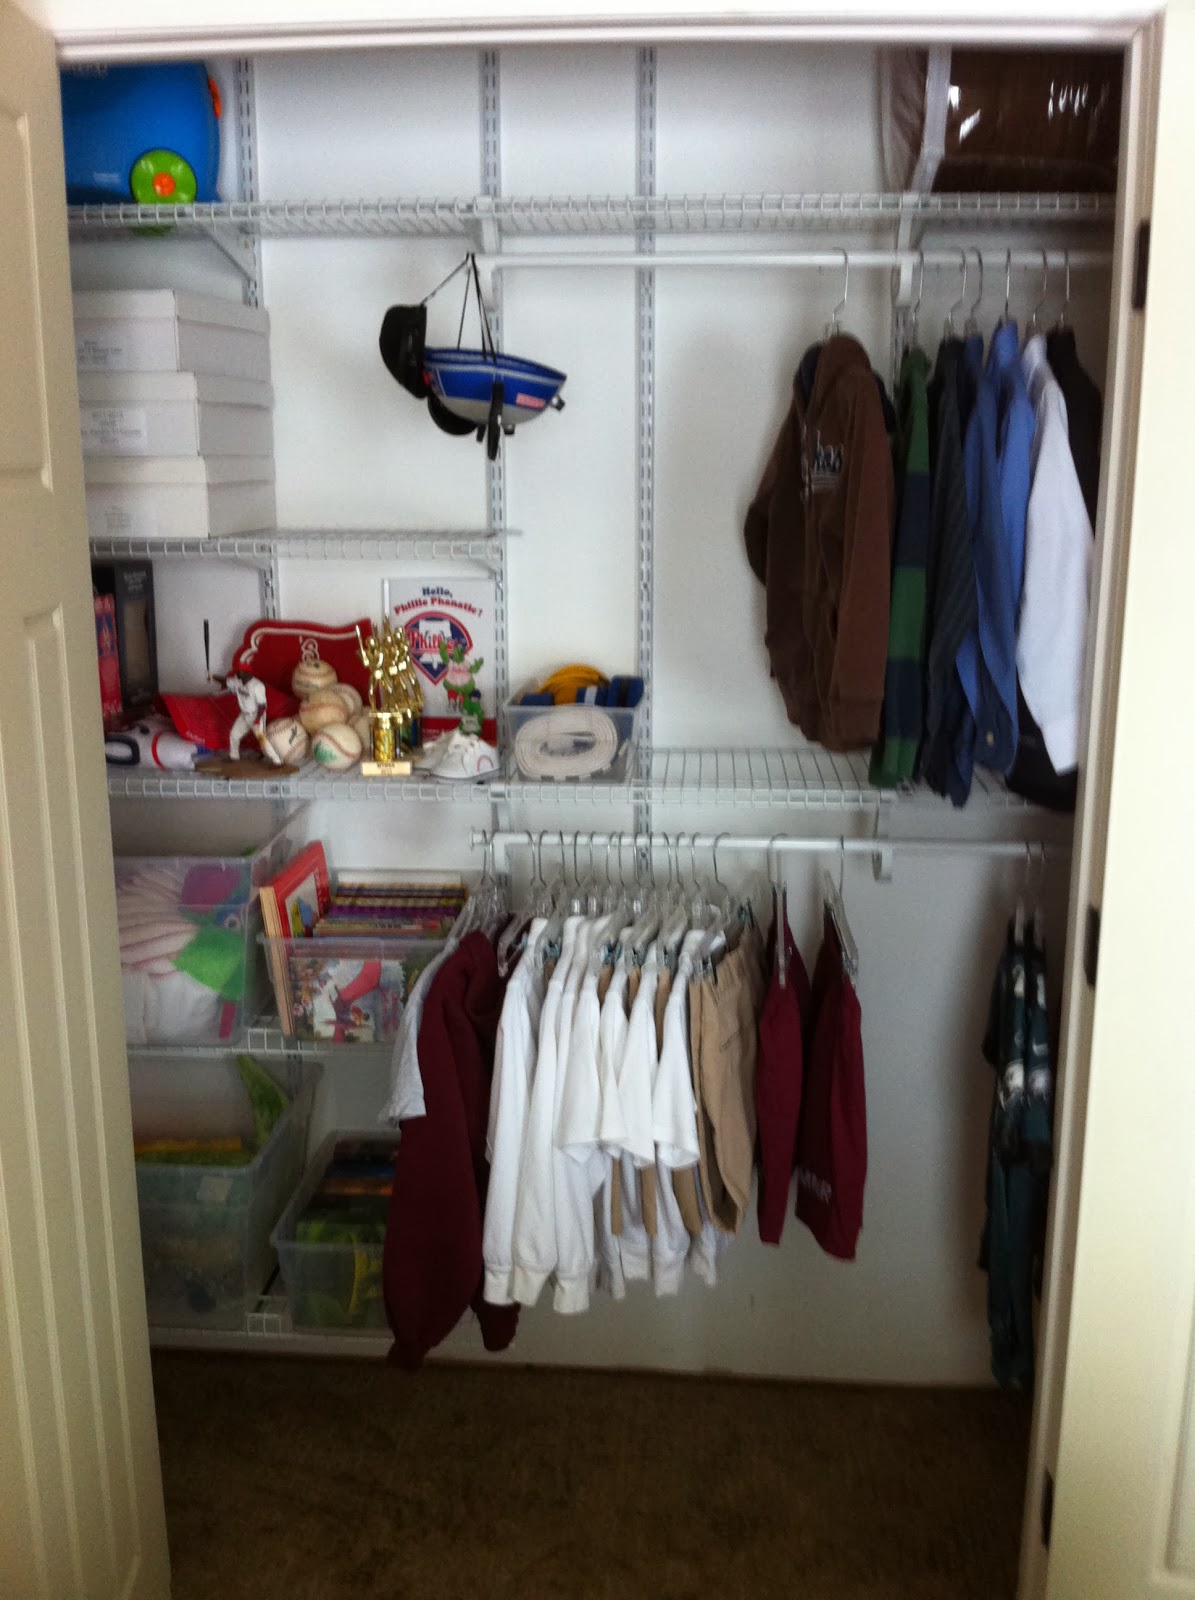
You can see, it isn't pretty.  There's a good foundation, but somewhere around...ah, who am I kidding...it's a mess in there!!!  Another place that when the door gets shut, I instantly forget that it exists.

I placed the plastic containers with his books (which, were organized earlier in the challenge) in here as well as two with his stuffed animals.  Plastic containers are good wranglers and keep these items from slipping between the wire tines of the shelves.  

To get a handle on the closet's contents, I began by emptying it out.  It seemed that a clean/clear canvas was needed.  While doing that, I started to make piles...this time it was 3: keep, donate and trash.  Once that was done, the "keep" was then separated out further into like items.  School uniforms were put on the lower rack for easier access while other hang-able clothing, up top.  Baseball memorabilia got its own shelf and was neatly displayed while the books and stuffed animals took lower (again, easily accessible) shelves.


Every school year I open a new storage box for all the items collected throughout the year like art projects, etc.  I label the front of each box with the school year and teacher so that we can "look back through the years."  The boxes are alike; however, I realize that through the years their availability might become nil - so, next time I'm at the store, plastic storage containers (12) are on the list for purchase.  (I like clear containers because they are easy to see through, but realize others may dislike them for just that reason.)   
When I was done:

...the harps played.  This was a spot that for months, I wanted to tackle...so happy it's finally done.


28 Day Cleaning/Organizing Challenge (Day 12 - School-Agers Drawers)


Leaving the condition of your child's drawers in their hands leads to this...

You would think having given him neatly folded piles, they'd magically appear in the bureau without worse for ware. Instead, in opening a few drawers, I found the state of his wardrobe to be less than desirable. Why have folded them in the first place??? I guess this exercise in futility taught me something, you can lead a horse to water, but can't ensure they'd do things the way you would. From now on, I'll leave dusting and making his bed to him while the laundry, (at least folding and putting it away) will remain on my list.

To get things into order, I removed everything and laid it out on his bed. This was a great opportunity to remove anything that has been torn/tattered, outgrown or could be donated aside. Then, I put all similar items together so that when they go back like will be with like. This is another place (like our linen closet) that the way I fold is directly related to how it will fit in the drawers.

Here is how I fold a shirt:

Short Sleeved
Step 1: After shaking out your
shirt, lay it face-down on a
flat surface.
Step 2: Begin by folding
shirt in towards the
middle.  Make crease at
collar opening.


Step 3: Fold back onto
itself the sleeve, lining
it up with the folded edge.
Step 4: Repeat Steps 2
& 3 on the right side.
Step 5: Take bottom
hem and fold up.


Step 6: Flip shirt over.

Do the same for a long sleeved shirt except:

Additional Step: Fold
sleeve down with a mitre.


When I filled the drawers back up there was one for: ankle socks, full socks, underwear/pajamas/white TShirts, shirts (both long and short sleeve), pants and then sports gear.


Thursday, February 13, 2014

28 Day Cleaning/Organizing Challenge (Day 11 - Master Closet)

His Side
Her Side
 If you see into another person's closet...does it reflect their soul???  Hopefully, in my case - not.

So, it's gotten a little out of hand in there.  Ordinarily, I'm pretty tidy behind these doors. For me, all my clothes are in here (I don't have a bureau).  However, this isn't his whole wardrobe.  Probably because the size of his items are larger, he also needs 6 drawers of furniture (which, you'll see at a later date).  I'm not bitter...nooooo.  Honestly, having minimal clothing makes my life easier.  I don't like choices, they cloud my judgment.  I digress...

Anyway, as you can see the closet is divided up into quadrants:

     HER SIDE:
          Containers:
               Socks, Handbags/Belts, Lingerie/Bathing Suits,
               Underwear/Bras, Sleeveless TShirts, and Shorts
          Shelves:
               Long Sleeve, Short Sleeve and Sleeveless TShirts,
               Sweats/Yoga Pants and Jeans
          Hanging:
               Sportswear, Capris, Pants and Skirts
               Dresses, Button-Up Sweaters, Pullover Sweaters,
               Button-Down Shirts and Sleeveless Camis
          Shoes
  HIS SIDE:
       Containers:
             Ankle Socks, Socks, and Ties
       Shelves:
             Sweats, Thermals, Jeans, Long Sleeved Shirts and 
             Sweaters
       Hanging:
             Sportswear, Long Sleeved Dress Shirts, and 
             Golf Shirts
             Work - Pullovers, Sweaters, Button Down Shirts, 
             Golf Shirts and Pants
       Shoes


Here are the finished products:

His Side
Her Side

When organizing, I place items on the shelves by color.  The end result looks fabulous!!!
(There were items that were removed and will be donated.  Sadly, a few pairs of shoes wound up in the bag.  Sniff, sniff.)

28 Day Cleaning/Organizing Challenge (Day 10 - Toy Chest)

When you turn the lights out...they multiply.  Toys, toys everywhere!!!

Well, if you are like me, you'd like to tame the beast.  The pictures above are really only a few piles that we have around the house.  My mission is to keep them in two places, separated per child (we have a schoolager and infant).  

Certain toys, need to be kept away from little hands.  To remedy this, I use containers with a locking mechanism.  Items are placed with like items; for example there are containers for: games (2), cars, super heroes/villains, action figures, mini action figures and LEGOS.


Toys that aren't going to get swallowed go in a basket for easy access. 


Monday, February 10, 2014

Valentines Day Idea (Schoolager/non-card)

In our already busy lives, its hard to keep up with the Jones. Personally, I've probably seen a hundred cute ideas of something unique to send in with our schoolager. But, who am I kidding??? With an infant in the house, I'm lucky my socks match - wait, if I have CLEAN socks - everyday. In an effort to avoid store bought (not that there is anything wrong with that), I came up with the following idea:
 

Start to finish it took me 20 minutes to put these together.  After finding cute clipart and printing out on mailing labels, all I had to do is peel and stick...I think they turned out really ed-ib...er uh, cute.

Sunday, February 9, 2014

28 Day Cleaning/Organizing Challenge (Day 9 - Laundry Room)

I'm not a big fan of where our laundry room is...in the basement.  Every time I go down there, a thought passes through my mind - dungeon.  Maybe that is why I don't really ever pay much attention to how it looks.  There are times when I feel like it should be cleaned up but it really takes a lot for me to get there.

This is what it looks like:

You'd think that having gotten beautiful new machines would spur me to keep things up, but it doesn't.  So having this on my To Do List was a good thing.

I straightened up the washing/drying products on the top and put down a towel so that they don't scratch the machine's finish.  In the 8 years we've lived here, I've never cleaned the utility sink so it was time to do that too.  Who knew that the reason the water flow from the spigot was at a drizzle because the screen needed to be cleaned of sediment???  When all was done, this is what it looks like:


A few plastic bins keep the dryer sheets, Oxy-Clean and sprays together.  What I think is my piece de la resistance is our laundry sorting area.  This is what it looks like:


 I separate clothes into darks, jeans, lights, whites, reds and linens...there are some who think this is crazy but I take washing like things together very seriously.

There have been a few things that I saw on Pinterest where people have built a laundry center where the baskets slide in/out and I would LOVE to have something like that...I can dream right???